

Step by Step Guide for updating The Hub Software and CoPilot System(s)
Applies to: CoPilot; Hub
Required: RJG Inc® Website Login Account; Access to The Hub’s Server Webpage; Internet Connection, Google Chrome Web Browser (Recommended)
Warnings: Refer to the Hub Software or CoPilot Update descriptions on the RJG Website to ensure an older update is not required before applying the newest update. This will ensure that the current update being applied to the Hub or CoPilot ensure no errors or issues could occur to both systems.
It is mandatory to update The Hub software FIRST before applying updates to the CoPilot System(s). First, navigate to the RJG Inc software downloads section on the website and select the latest Hub & CoPilot software version.
Description: It is always best to ensure that products stay up to date for new features and bug fixes. This step-by-step guide will go through how to update The Hub Software and CoPilot System(s).
After downloading the updates to your computer, unzip the files and store them to a place on a PC that is easily accessible.
Updating The Hub Software
- Download the Hub Software update from https://rjginc.com/support/software-downloads/ to an area on the PC that is easily accessible (Downloads Folder, Desktop, etc) and unzip the folder.
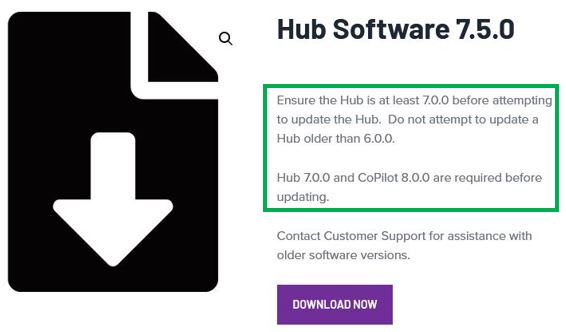
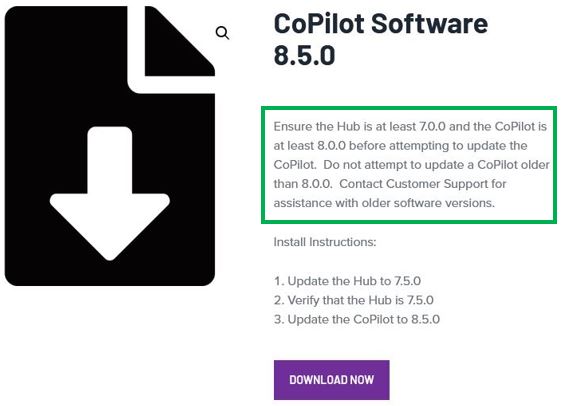
- Note: Please refer to the Hub Software description on the RJG Webpage to ensure that an older update is not required before applying the newest update. Please reference Figure 2 for an example
- Access the Hub’s webpage from a PC and sign in. Once signed in, select the Menu Button towards the top left of the screen and select “Settings.”

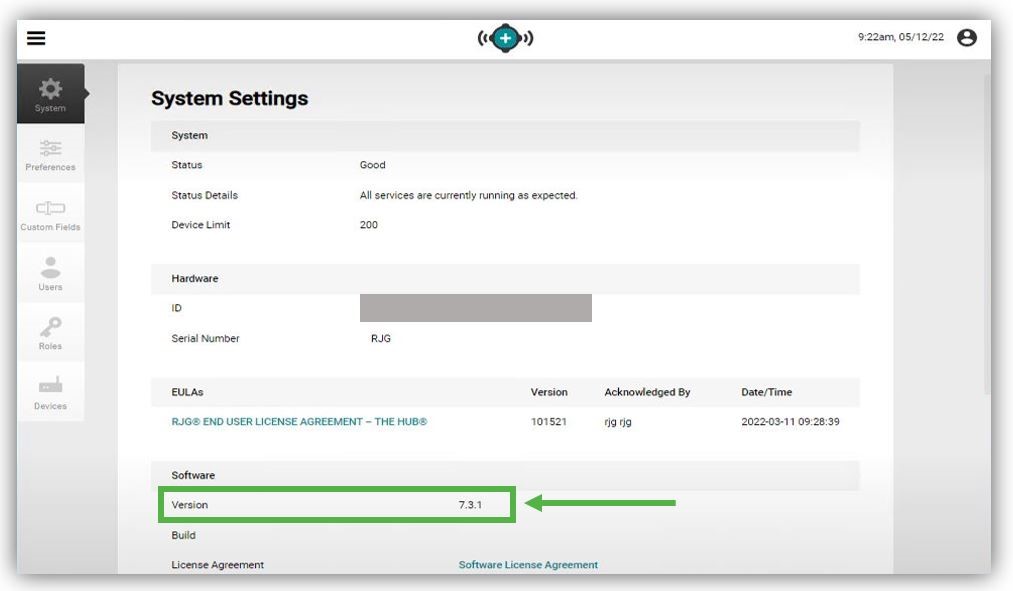
- Once in the Hub System Settings window, scroll down the webpage to check the current software version of your Hub. The current Hub Software version will determine if an update is needed, or if older updates are required before applying the newest update
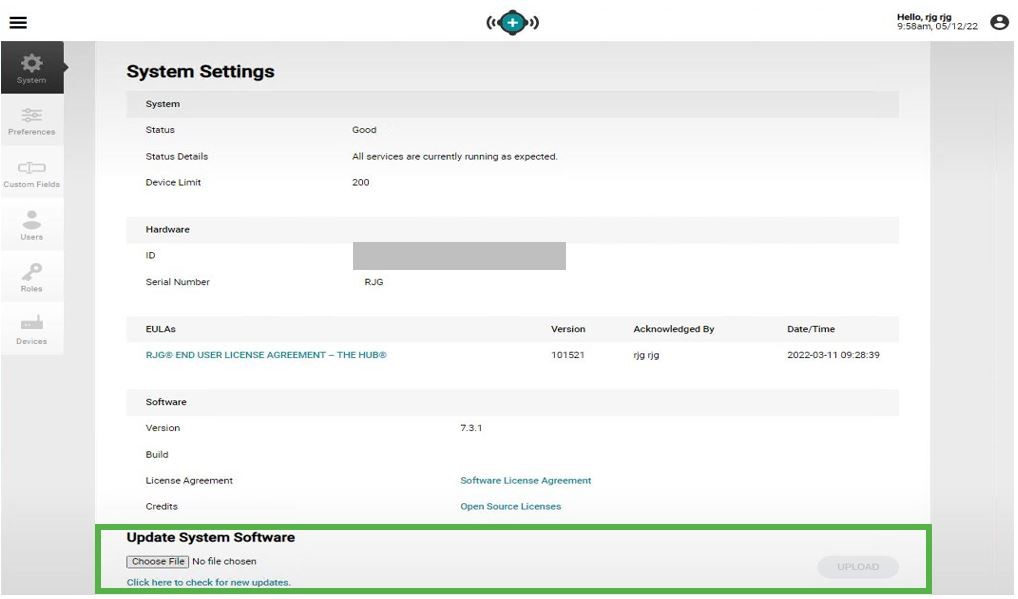
- In the System Settings window of The Hub, navigate down the webpage to the Update System Software area. See Figure 3.
- Note: Ensure that a user is signed in if this area is not displayed
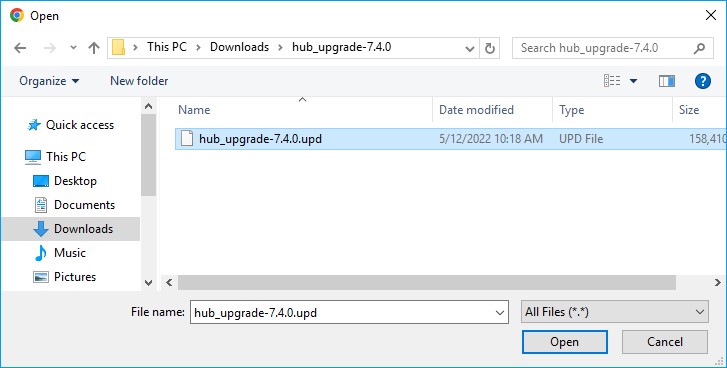
- Select the “Choose File” button to open a Windows File Explorer. Navigate to the unzipped Hub Update folder that was recently downloaded, select, and open the .udp file.
- Select the upload button on the System Settings webpage to upload the update. Once the update has reached 100%, select the Install Update button.
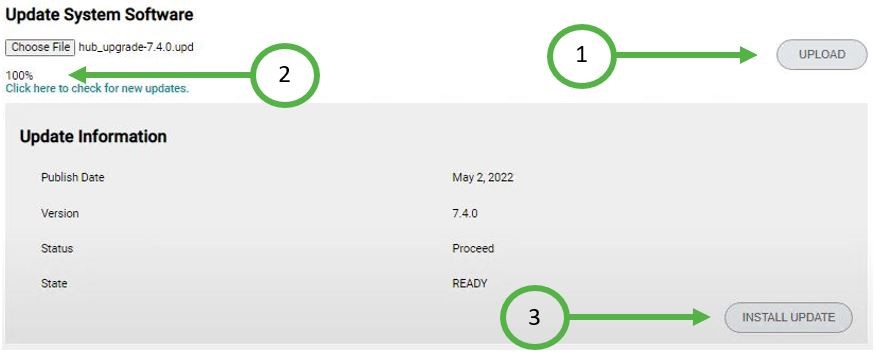
- Give the system about 2-5 minutes to install the update. Refresh the webpage and confirm that the Hub version is now updated.
Updating the CoPilot System(s)
There are three different ways to update CoPilot Systems. Multiple CoPilot System(s) can be updated through the Hub Webpage all at once vs individually.
A user can target a specific individual CoPilot and update remotely by entering the targeted CoPilot System’s IP Address into a Web Browser. Or if a CoPilot system is not connected to a network, you may download a CoPilot Update to a USB Flash drive and plug the flash drive into a CoPilot System and apply the update manually.
- Download the CoPilot System Software update from https://rjginc.com/support/software-downloads/ to an area on the PC that is easily accessible (Downloads Folder, Desktop, etc) and unzip the folder.
- Note: Please refer to the CoPilot Software description on the RJG Webpage to ensure that an older update is not required before applying the newest update. Please reference Figure 5 for an example
- Note: Please refer to the CoPilot Software description on the RJG Webpage to ensure that an older update is not required before applying the newest update. Please reference Figure 5 for an example
Warning: Do not power off a CoPilot System during the update installation process until confirming that the CoPilot System update has successfully installed.
Updating CoPilot System(s) remotely through the Hub Software Webpage
- Access the Hub’s webpage from a PC and sign in. Once signed in, select the Menu Button towards the top left of the screen and select “Settings.”

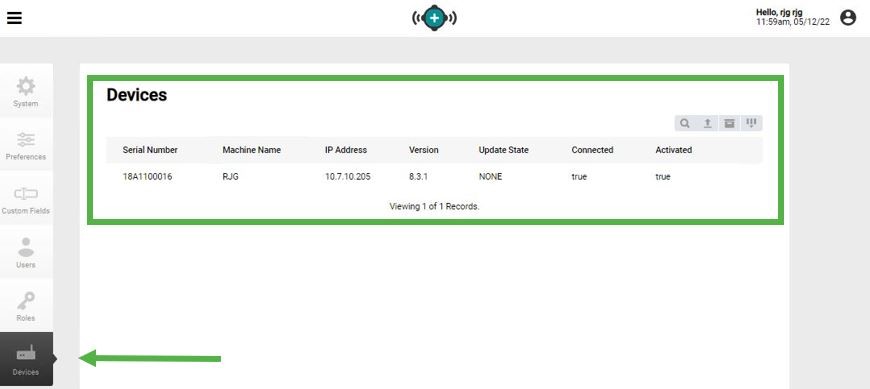
- In the System Settings webpage, select the Devices tab on the left side of the screen to view a list of CoPilot System(s) currently connected to the Hub.
- Note: To determine if a CoPilot System is currently connected to the Hub , the Connected Status will show “True,” indicating a connected, or “False,” indicating disconnected.
- Select the update icon and select the CoPilot System(s) to apply the software to.
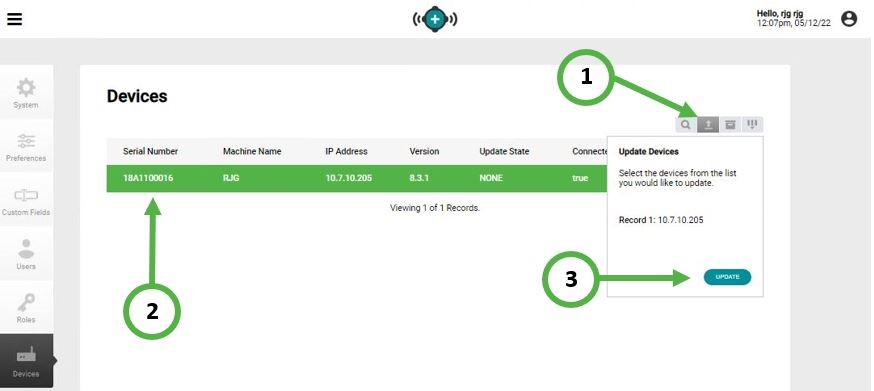
- After selecting the update button (Step 3 in Figure 8), select the pencil icon and select the “Choose File“ button to browse for the CoPilot update file that has been downloaded to the PC. Select and open the .udp file
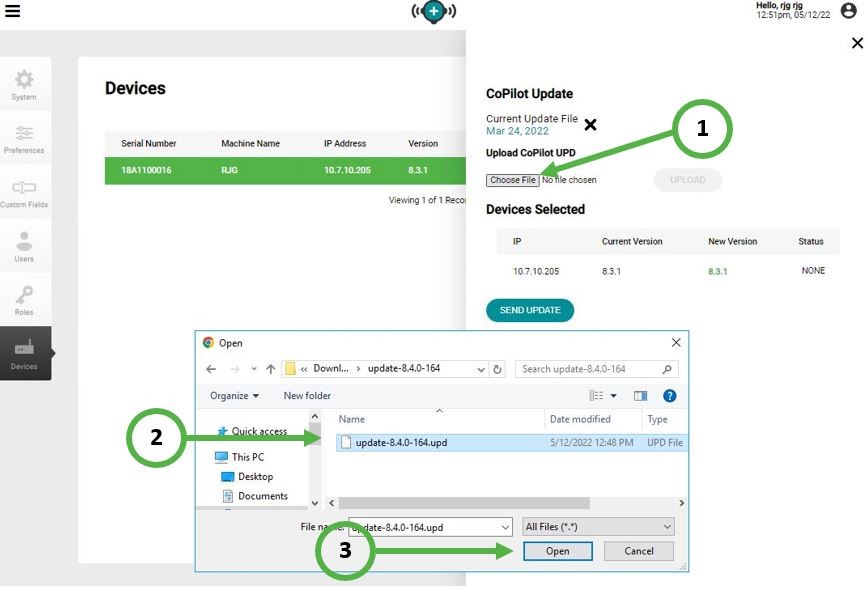
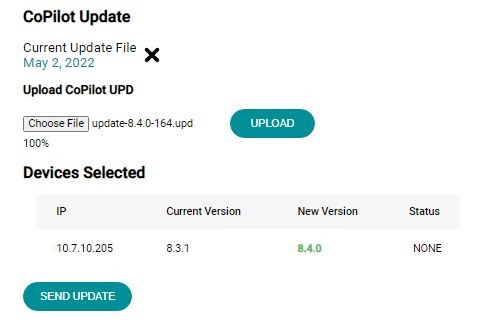
- Select the Upload button to to start the upload process. Wait until the upload reaches 100% and then select the “Send Update” button to send the update to the selected CoPilot System(s).
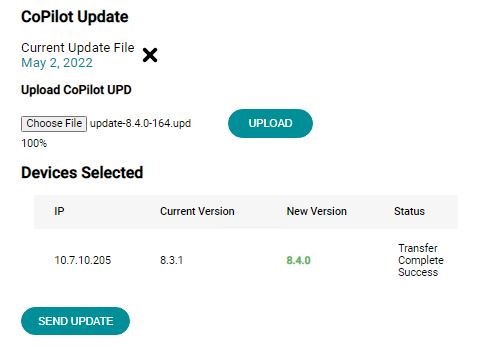
- The transfer process will start. Once the status displays “Transfer Complete Success,” the update will now be available on the selected CoPilot System(s).
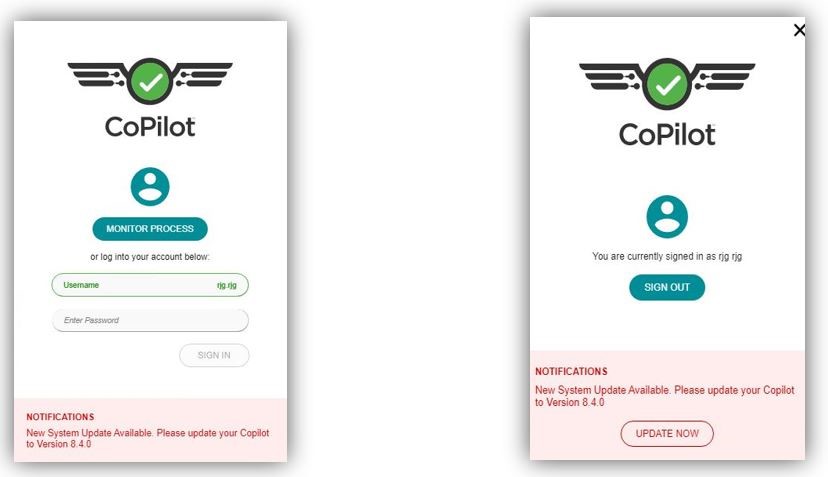
- The CoPilot(s) that received the update will now display a notification at the Login Screen. You may select the “Update Now” button to start the installation process.
Warning: The CoPilot will need to reboot after installing the update. If the CoPilot is controlling V-P Transfer, Inject Enabled, Part Reject, Part Sorting, or Valve Gates on the machine, ensure the Injection Molding Machine & CoPilot Job is stopped before rebooting the CoPilot System.
- To ensure the CoPilot System Update has successfully installed, refresh the System Settings Devices webpage to display the current version of the CoPilot System(s).
Updating an Individual CoPilot System remotely without utilizing The Hub Software Webpage
- Type in the CoPilot System’s IP Address into a web browser to access the CoPilot System’s Web Page.
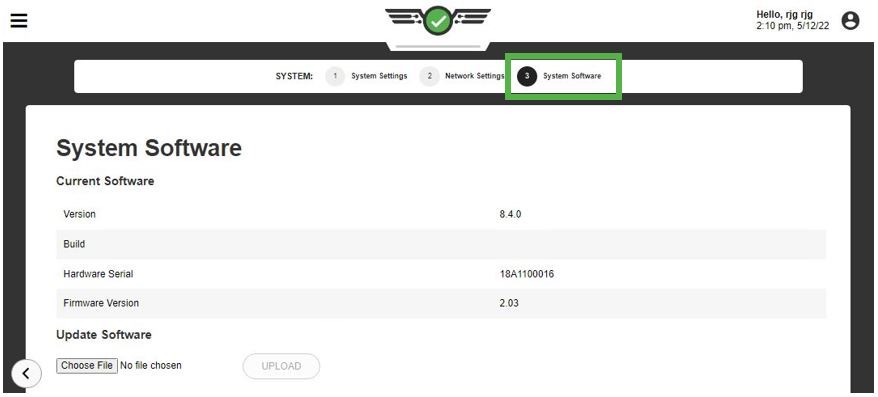
- Sign into the CoPilot System and select the Menu Button towards the top left of the webpage and navigate to the settings. This will open up the CoPilot System Settings. Select the “System Software” option towards the top of the webpage
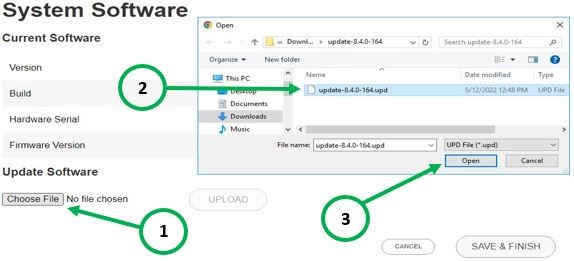
- Select “Choose File” and browse for the CoPilot update from the PC. Select and open the update.
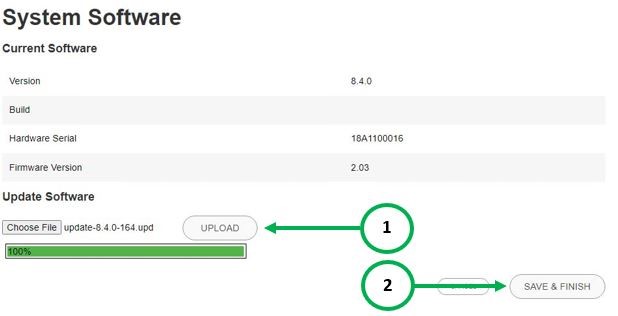
- Select the Upload button to upload the CoPilot up. Allow the update to reach 100% and select the Save and Finish button.
- Once the upload process reaches 100%, the CoPilot System Software update will now be ready to be installed. Select the user icon on the top right of the screen. Select the update now button and the CoPilot will install the update. Refer to Figure 12
Warning: The CoPilot will need to reboot after installing the update. If the CoPilot is controlling V-P Transfer, Inject Enabled, Part Reject, Part Sorting, or Valve Gates on the machine, ensure the Injection Molding Machine & CoPilot Job is stopped before rebooting the CoPilot.
Updating an CoPilot System Locally via USB Flash Drive
With following previous steps listed on this step by step guide by downloading the CoPilot Update from the RJG Website onto a PC, you can copy and paste the CoPilot update .udp file onto a USB Flash Drive.
- Insert the flash drive into a USB port of the CoPilot. Sign into the CoPilot and select the Menu button to navigate to the CoPilot System(s) Settings.
- Once on the System Settings, select the #3 Button: System Software near the top of the screen.
- Select the “Choose File” button and navigate to the USB Flash Drive
- Select the CoPilot Update .udp file and select Open
- Select the Upload Button on the CoPilot System. Once the upload process reaches 100%, you may select Save and Finish and Navigate to the User Sign In Screen by selecting the User Icon on the Top Right of the CoPilot Screen where the user will be prompted that a Software Update is available.
Warning: The CoPilot will need to reboot after installing the update. If the CoPilot is controlling V-P Transfer, Inject Enabled, Part Reject, Part Sorting, or Valve Gates on the machine, ensure the Injection Molding Machine & CoPilot Job is stopped before rebooting the CoPilot
- After the CoPilot system has rebooted, confirm that the CoPilot System update has successfully installed by navigating back into the CoPilot Systems Settings and to see the current CoPilot Version.
If you have any questions, please contact our Technical Support Department by emailing support@rjginc.com or by calling 800-472-0566